Dora backpack invitations

Thursday, September 30, 2010

My youngest daughter wanted a Dora birthday party this year. She's been very adamant that it's Dora themed. I wanted to bring the fun Dora theme to the invitations in a personalized way. I was a little bit stumped as to how to do that... so I went online. I Googled "Dora party invitations" and a lot of pictures of backpack came up. I also came across a couple handmade backpack invitations and I thought, well... if they can do it... I can too. And so I did! 


The hardest part was coming up with the template. I wanted to print them on purple card stock from home and them just fold the card stock to look like a backpack. 


It took a couple tries but then I came up with a shape I was finally happy with. I ended up printing out a couple copies of the backpack on white paper just to give me the shapes of the eyes and mouth. 


After that it's all about cutting out the mouth, eyes, eyebrows and lots of gluing! I think it turned out pretty cute though! And I've gotten a lot of complements on them from other parents. I think that even though it was a lot of cutting and gluing, it was worth it.


Another special touch I did was cut out strips of purple card stock and glue them to the back of the invitation like backpack straps. 


Here is the finished product :)


CLICK ON THIS PICTURE TO PRINT OUT THIS TEMPLATE

For new crafts, yummy recipes and fun ideas follow me on facebook: https://www.facebook.com/FromBeccasHome

Pumpkin Pie 101- Pie Filling

Monday, September 27, 2010


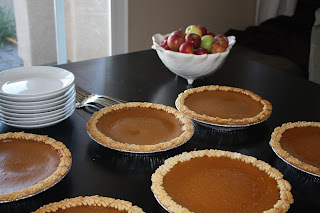
Pumpkin Pie is really an easy pie to make. There's no tempering of the eggs to worry about. Basically you just mix the ingredients together, pour into the shell and bake. I think the filling of a pie is as unique as the person making it. For instance, I love flavors. I'm a big spice person so I like to go a little heavy with my spices. When I was growing up my mom used to tell me to add "heaping" teaspoons of spice... that means the teaspoon looked like it had a small mountain of spice in it :) That little teaspoon was literally was holding all it possibly could. But a good friend of mine prefers to go light on her spices and add some orange zest to her pies. Feel free to experiment with your fillings. The important thing is having a good base recipe for your pies and then you can play around with the amount of spices and flavors you add. 


Here's my good base recipe (makes 2 pies):
A large can of Libby's Pumpkin (29oz)
2 cans evaporated milk
4 eggs
1 1/2 cups sugar
Add spices to taste.... here's where I can't divulge what spices I use in my own pies :) 

But I gave you an excellent base to begin with. Your pie will be rich and creamy. Follow my cooking instructions on the pie crust post and you're sure to have an award winning pie! 


Have fun baking!

Flip - Flop Friday

Friday, September 24, 2010

I know I said my next post would be about pumpkin pie filling, but since I didn't write this next post I figure it's fine :) I thought on my Friday posts I'd take a minute to showcase other awesome blogs. This Friday I've chosen to showcase my sister's blog www.everkelly.com. So here's my first "Flip-Flop Friday" post. Hope you enjoy!

DIY Birch Bulletin Board

Pinboard7
Happy Friday, everyone!  Well this week was my first attempt at MWF posting as I sprint towards Fall Quilt Market, and I missed being here every day.  However, I’m getting a lot done so I hope you’ll hang in there with me.  Just 5 weeks to go.
Today I wanted to share a simple, but pretty how to project.  In the class I’m taking, we’re creating lots of mood boards and color stories so I wanted to have a nice place to display my inspirations.  I thought this turned out so well, that you might want to make one too.  I love how the opalescent paint is subtle enough that it won’t compete with what I pin to the board, but still provides something pretty to look at when it’s blank.
First things first — The Materials:
Pinboard2
Let’s get started…
1)  Staple your fabric and batting to the board. Lay your fabric face down on the floor and then layer your batting on top followed by the homasote board.  Pull the fabric as taut as you can as you staple working from the center of each edge towards the corners.  If you’ve ever watched anything on HGTV, you already know how to do this step, but here’s a post where I used the same technique if you need a little more help.  Here’s the board upholstered and ready to go:
Pinboard3
2) Mark off your birch trees with blue painter’s tape. Have fun with this step.  Your trees shouldn’t be perfectly straight since they certainly wouldn’t be in the woods.  I made some of the trees a little wider towards the bottom.
Pinboard4
3) Cut small triangle shapes to create lines on the birch trees. I found that slightly irregular shapes looked a little bit better, and I tried to cut the triangles smaller for the skinnier trees.  Other than that, there are no rules on this step.  Just keep adding triangles and lines until you like the arrangement.
Pinboard5
4) Paint. Before you paint each tree, take a moment to run your finger over each piece of tape to make sure it is adhered tightly to the board.  Grab a sponge brush and paint each of the tree sections smoothing out your brush strokes as you go.
Pinboard6
5) Remove tape and marvel at your lovely inspiration board.   (Picture at the top).  If you’re wondering how long I waited before removing the tape, I gave it a minute or so.  The screen printing ink is very thick so it won’t run anywhere.
How will you hang it? There is a flush-mount hanger-fastener at the bottom of this post that would work perfectly. We found the fasteners at a boutique hardware store.  (For some reason, I can never find them at big box stores like Home Depot.)
Let me know if you’re going to try this one!  Hope you have a wonderful weekend.  I think I’m going to be playing around with my new inspiration board and hopefully spending some time outside with the camera.  Take care, Kelly

Pumpkin Pie 101 - The Pie Crust

Thursday, September 23, 2010

One of my bakery's most popular items is my pumpkin pie. Pumpkin pie is one of those deserts I wait all year for. Once football season has started I know it won't be too much longer till I can have that first slice of pumpkin pie. I love pumpkin pie! I have wonderful memories of waking up on Thanksgiving morning and eating pumpkin pie while watching the Macy's Thanksgiving Day Parade. Let's face it, pumpkin pie is amazing. And you can make your pumpkin pie even more amazing with a few simple tricks. 


Before I start mixing ingredients I work on the crust. Some of you prefer your own dough and some of you prefer the store bought dough. Either one will work. One suggestion: if you don't make your own crust frequently and don't have a favorite recipe for a crust then save yourself the hassle and just buy the pre-made dough. Also go ahead and spend the extra dollar and buy the name brand one. It tastes good and your guests will never know it's not made from scratch :)


Big Tip #1:
The key to my crust is the leaf design. I use pie crust cutters that leave a leaf pattern and cut out in the dough. 


I punch out about 30 leaves to put on the edge of my crust. After I've laid the dough in the pan I dip my finger in water and run it around the edge of the dough. I lay the leaf cutouts around the edge. Ta- Da! Done. See, I told you it was easy. The key to the design is really the "pie crust cutters." 


Big Tip #2: 
I put the pies in the oven once they are filled at 400 degrees for 10 min. 


Then I turn the temp down to 350 and I put "pie crust shield" on the crust. Pie crust shields are basically large circles of metal that go on your crust and have a big open circle in the middle so your pie can cook without burning your crust. If you do not have these, foil on your crust will prevent your crust from browning too much or burning. I then continue cookie the pies for about 45 min. 


In the next post I'll talk about the filling :)

The things I find....

Wednesday, September 22, 2010

While out shopping last weekend I found themed pasta! I found "Fall Harvest" and "Halloween" pasta. I mean, who doesn't want to eat spider shaped pasta and pasta leaves??? I can't tell you how excited my 5 year old little boy was about the spiders. And I thought it was very cute. Besides, the best part was that it was only $2.99 for a bag. I found them at the store World Market. I just love when I find fun things like that.


Tomorow I'm doing a blog post on my pumpkin pie :) I'll show you all how I make those amazing crusts!

More notable cut-outs

Tuesday, September 21, 2010

Mice....

Real mice make me go "eeek!" But there's something about these mouse cutouts that I love. Maybe it's the fact that I think they are kinda cute and they are not real... I'm definitely not fond of the real kind.


I put my mice around my fireplace tiles so it looks like they're scampering up to their hole.


I'm thinking of adding some more mice to the top shelves of my fireplace.... it seems a bit bare to me. What do you think??


I think I have some more tracing and cutting to do! If you'd like to do this craft you should try it! It's so simple! Click here for the Martha Stewart template. Then trace your template on black paper or black card stock. Remember my painters tape tip, it works great for the mice too! When you go to store your adorable mice for next Halloween separate them with wax paper and store in a manila envelope to prevent bending. Enjoy!!

Halloween is in the air.... or rather on my walls!

Monday, September 20, 2010

I love, love, love Halloween. I'm basically a holiday nut if I'm being honest. But I think I'm so obsessed with Halloween because it's the first of the big 3 holidays in my book... ya know... Halloween, Thanksgiving and Christmas. Those are the 3 holidays that I go all out! I just couldn't restrain myself this past weekend and I took the decorations out. Some of the first decorations to come out were the hand made ones. Last year I spent a lot of time cutting paper.... and I must say I think it was worth it. I cut bats out of card stock last year and I taped them to my walls. This is what they look like:


....And yes, that is a handmade "Happy Halloween" banner. I'll show you how I made it in a later post. And of course I had to make a hanging bat. We named him Henry. I'm not sure why but he's special since he hangs up side down. This year he's by our back door curtains.... he moves every year :)


To be honest, these bats took some time to cut out. But once they're done I really think they are worth it. I think it's an easy and affordable decoration too! I highly suggest you give it a try. All you need is some black card stock, scissors and tape. To get the bats to stick to my satin wall paint I had to use painters tape (aka the blue tape at your local hardware store).... and a lot of it. But it comes off really easily without damaging the walls! I got this idea from the Martha Stewart magazine. And I give this one 2 thumbs up! Martha Stewart used to have the bat templates available online, but she recently removed these since she's now selling packs of the pre-made bat cave silhouettes. The easiest way to make this at home would be to search online for a bat silhouette, find one you like, print it out, and trace the outline onto card stock. I hope you find this little craft as fun as I did. 

A New Course....

Sunday, September 19, 2010

Recently my bakery (www.beccasbluebakery.blogspot.com) has been very busy. I found myself up till 2am multiple nights in a row to get cakes done. I was very proud of what I did but I found it very hard to keep up with the demand while still being a wife and mom. I also had another blog that I'd post on periodically (www.beccastopsyturvytales.blogspot.com). I realized that the posts that I really enjoyed were the ones where I was showing how to make a craft or a recipe. Those were my thoughts in creating this blog...

I'm going to be showing you the crafts I do to make my house a home....and I'll be showing you how to do them too. I'm also going to be showing you tips and tricks to get your baked goods to look like mine. I love sharing these tips with my friends and I'm really excited to be showing you how to do them too. I hope you enjoy this new blog!