Throwing a Jungle Party, Part 3: Leaves & Vines

Thursday, July 12, 2012

I think this deserves an entire post to itself because creating vines and cutting out a LOT of leaves takes a LOT of time. The great thing is this can be done while watching TV ;)

To create vines, I purchased a large role of brown packing paper, it weighs about 50lbs! This is a serious role of paper. It's only about 2-3 feet wide, but it goes on for 1400 feet or something crazy like that. This can be purchased online or at a UPS store. I unrolled about 10-12 feet and cut it from it's roll. Than I grabbed one end, bunched it together and started rolling it in one direction. Very important not to switch direction- it will unravel. I continued rolling and crimping every few feet to keep it secure until the end. You have to use nails or some heavy duty tape to stick it to your walls because this will be fairly heavy. I hung one across our kitchen by tying some twine to our cabinet hinges. I than tied the twine to the vines and it stayed for over a week! Consider tying it to a curtain rod 


caution: make sure your curtain rod, or whatever you tie it to, is stable and secure and will not fall and cause injury. 


I did this a week in advance, both to make sure the vines would stay, but also because it could be done in advance. Why not do it as early as possible so its one thing checked off your list?


After the vines were literally hung throughout the house, I cut the leaves. I used two different colors of green paper. Regular printing paper or construction paper will work for this. It doesn't have to be thick paper. Using my template I cut out the leaves. I folded them in half while cutting to make sure they were symmetrical and to give the leaf a nice crease! I probably cut over 100 leaves. I used them on the vines and I laid them out on the different tables. They added a nice decorative touch. 

Throwing a Jungle Party, Part 2: Hydration prep

Now we enter the not so fun prep work... My best suggestion is to put on some music you love and just buckle down and do it. I took frequent breaks so as not to have cramping in my hands or back. I suggest you do this too. Even if you don't feel like you need a 5 minute break, getting up and walking around...maybe getting yourself a glass of water will really help you out when you are 2 hours into a project.

Now these projects are very straight forward but they are redundant...and I really don't like redundancy. But the end result is worth it!

Step 1: Create your labels (this part was actually kinda fun)
     - I just used Microsoft word to creat my labels. I picked a background image and added a text box
     - when I needed a really long background image I just enlarged the image on my screen. You can either
       cut away any excess background or you can insert blank clip art boxes (with out border lines) to create
       the blank space needed. 


Once you have your labels cut to the size you need, you are ready for the hot glue gun! Here is a pic of my assembly station:


I removed the straws from the juice boxes (keep them sealed in the wrapper- so don't yank them off too quickly). Than I wrapped my paper around the box to line it up and create nice creased edges. I hot glued one edge to the box, don't worry it won't melt through. Than just wrap the label around and hot glue the other edge to seal the label on. On the back of the label I used just a dab of hot glue to reattach the sealed straws. 


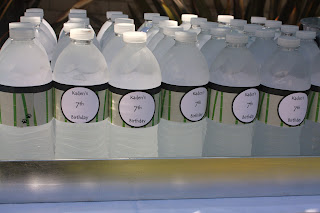
With the water bottles, I removed the previous water label and left any sticky residue (Walmart water bottles have GREAT sticky residue!) on to help grip the label. Than I wrapped the label around and used hot glue to glue the paper label to itself. Ta-da! Customized and simple. 


The last thing I did was make "Elephant Sneeze" which are basically mist bottles and if you turn the nozzle (as the kids quickly did) they become squirt bottles. You can find these in the laundry section of Walmart for $0.97 . And they make cute take home gifts. Where we live it is quite warm in July and these little squirt bottles were a hit. It's easy for little kids to grip, they don't run out and they won't crack and break like some of the cheap squirt guns. I don't know if you've ever had a kid excited about a squirt gun- just to fill it and it's leaking everywhere and won't work. That can cause a major melt down in my house. So these were perfect! I used similar labels as the water bottles, but in a different color scheme. I placed them in a galvanized bucket for a cute table piece and they are good to go! 

TIP: You might want to consider wrapping your label in clear packing tape to seal it. After an intense water fight some of my labels were soggy and torn.


The "Savana Water Hole" 


Throwing a Jungle Party: Part 1, Party Favors

This year my son asked me for an animal theme birthday party. My response: "Animal?....That's a really broad theme....can we narrow it down some?" My son: "....Well....ok....I really like lizards."
And that was the start of it. To be honest, I probably could have done a lizard party, but I'm really not a huge fan of all the reptiles, so I just did the whole jungle- lol! Here are some ideas for a great party, and let me tell you it was great! The kids had a blast!

First things first, when throwing a party, there is a lot of prep work. The first things I made were the favors. I knew that my hubby and I were gifting a bearded dragon to our son, so I thought 'how fun would it be to send a lizard home with everyone?' Now... I would never REALLY do that to other parents. I would never be forgiven- lol! But a plastic, realistic looking one would totally do the trick! Now, to package it to make it look real :) How about white little boxes, stamped with the words LIVE ANIMAL and FRAGILE. I also punched little air holes and tied it with twine.


On the inside I put shredded brown paper and the thank you.... along with the lizard of course. I bought a 12 pack of lizards off Amazon. I specifically purchased assorted plastic PVC Toy Lizards set of 12 (if you click on this link I'll take you right to them)  for $4.35. DEAL! And since we have Amazon prime, shipping was free, and tax free :) Love stuff like that! On the inside of the box, I wrote a little thank you poem. Any type of thank you note adds a personal touch to the favor. This is also a great way to customize it to fit your party. Here was mine:

"Thank you for spending your day with me. I hope it was fun -- as fun as could be!
Please remember to take care of your lizard in the very best way.
(Remember that lizards really like to play)
When you spot your lizard hiding in your dresser, possibly making it even messier...
Please don't scream out in surprise "this is not ok"...but instead remember the great time we had today!"


These were such a hit with the kids! One of the kids even jumped when they opened it- I guess these little lizards really do look real!

TIP: Once you place your lizard in the box, do not tip it over, the paper and lizards will get all tangled up and will not be as cute when opened.