Ever since we moved into our house, I have hated our kitchen cabinets. I realize they weren't hideous, but in all fairness a child did draw with permanent marker on one before we moved in. By the way, "Krud Kutter" gets rid of permanent marker on cabinets ;)
So I find myself about 6 months pregnant and some crazy nesting instincts take over and I decide I am redoing my kitchen! Well, first things first, lots of reading. If I was doing this, I was going to do it right. I have a very big kitchen and I would be very mad if it didn't turn out how I wanted. One blog that helped me A LOT was
Young House Love. They were inspiring and had some really good advice. So here is how I did it - step by step.
1. Remove all doors, drawers and hardware. You can lay them out nicely and admire your work....although the fun has barely even begun.
(Aren't they beautiful?!-- not!)
2. Clean your wood thoroughly. We used "Krud Kutter" and after we washed them with TSP. Now Krud Kutter is biodegradable, non toxic and whatnot....but TSP is not. You will need to mix it properly, use gloves, I used a eye protection and a mask too. And we washed as much as we could outside.
3. After a thorough cleaning it's time to sand! Yep.... I'm super obsessive so I have to make sure that paint is going to stick! Here are some pics of the sanding. I used 120 grit for this primary sanding.
(If you are sanding inside your house- which you will probably need to do...I REALLY suggest taping off the room and using some cheap plastic tarps to block any dust spreading to the rest of your house)
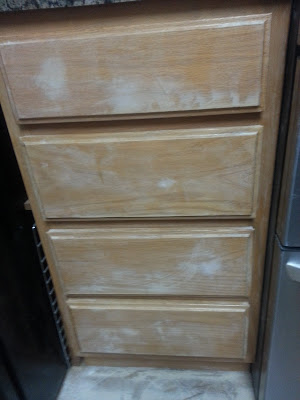
(Here is an idea of what they will look like after sanding)
4. After sanding, we clean...and now we can start priming! I really suggest you use a really good quality primer and do light coats. I ended up doing 2 light coats of primer.
5. Once both coats of primer are dry we start to paint! YAY! This is where you can finally see it really start to come together. A few things first- pick a really good paint. Pick one that is meant for cabinets, or moist areas. This is not the place to skimp on money. If you do this right it should last for years to come. A self leveling paint is also a bonus here. I used light coats here as well. It's really important to avoid drips.

(The bottom two drawers have paint- and the top 2 1/2 in this pic are still primer)
MORE PAINTING: In between paint coats - because you will do more than one...you want to sand very lightly with a very fine grit. This is also a time to sand down any drips you notice. We ended up using Vista Paint Pro-Tech which is meant for damp spaces and industrial uses. It was a little bit cheaper than the Benjamin Moore paint which was my #2 choice. All in all I'm sooooo happy with our choice. It dried beautifully and has held up very well (I'm writing this a month after the project). Because we used thin coats the wood grain texture is still evident which looks very professional. Our cabinets do not look like they have multiple coats of paint & primer on them- they turned out great!
6. After painting I took some time to really make the inside of my drawers and cabinets as pretty as the outside....well, prettier. Here is the before:
And YES- this is AFTER multiple cleanings....and scrubbing with abrasive sponges. I have no clue what the people before us were doing to their cabinets....but they sure did make a mess.
Here are my new- beautifully lined cabinets. Amazing what some contact paper can do....
And under the sink I added some peel and stick vinyl tiles.They might not photograph well, but in person they make under the sink look brighter and very clean.

7. After making the insides beautiful, it was time to add the jewelry- aka- pulls and knobs. We picked some aged bronze....which is really just a dark brown metal. I splurged on the pulls and knobs and let me tell you that when each one is $4 and you have 20 something doors it adds up fast. So I really didn't want to have to buy new hinges too....because after pricing it out it was going to be another $120. But I wasn't about to leave the brass hinges.... Here comes Rust-oleum to the rescue. I was able to spray paint the hinges and I happen to LOVE the hammered look.

Here are the spray painted hinges next to the new hardware. I think they look pretty good.
8. Time to hang your masterpiece and install the pulls, knobs and hinges. I recommend buying a stencil at your local hardware store to help you mark where your knobs and pulls will go- trust me it saves SO much time!

9. Now you can stand back and admire all your hard work.
Don't get discouraged when you are in the middle of your project and it looks like this:
yes...this honestly was my house for weeks....friends, this is why we couldn't do playdates at my house - lol!
And here it is! (Don't mind the black fridge that sticks out like a sore thumb, or the ugly light fixture...it's on the to do list ;)
Good luck guys! You can totally do it yourself! We ended up spending around $500 on this project, but we saved thousands. Seriously, it would have cost us a lot to have someone come in and do it for us- we looked into it :)


